
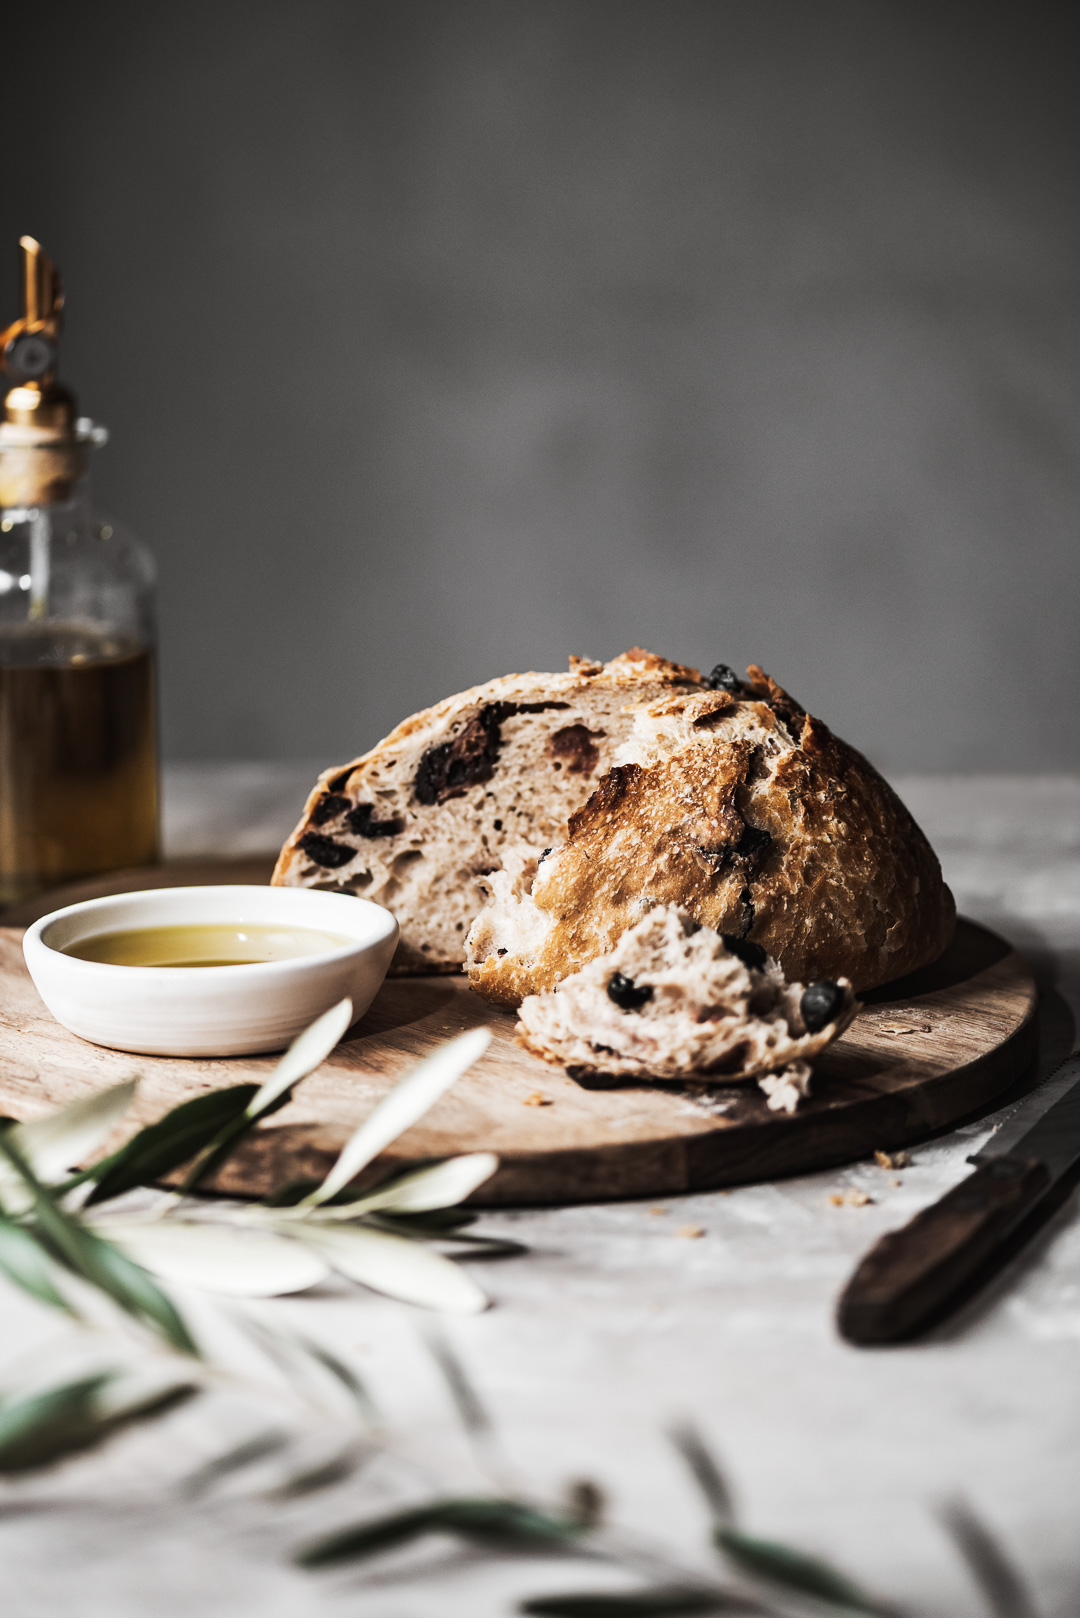
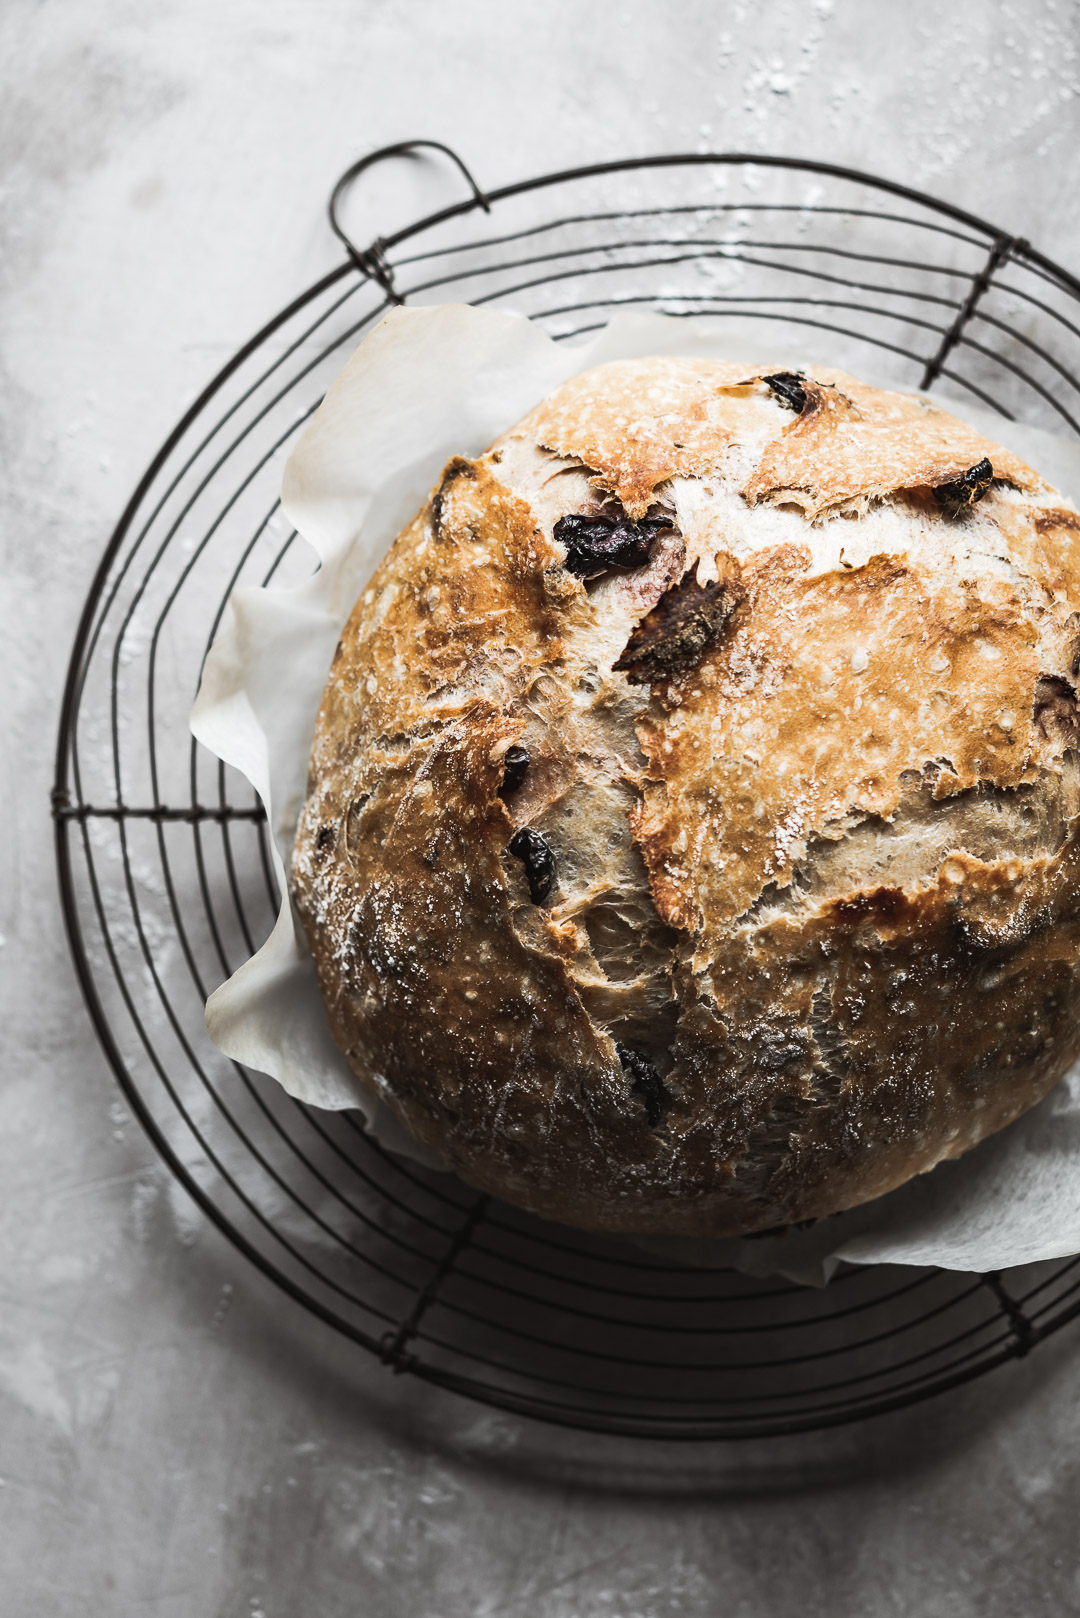
An impossibly simple rendition of the classic Greek olive bread. With a crisp crust and a tender interior flavored with Greek oregano and salt-cured Greek olives, this no-knead Greek olive bread is a comforting companion to some of our most beloved Greek meals.
GREEK OLIVE BREAD INGREDIENTS:
Just seven ingredients make up this simple, artisan-style loaf of bread. The quality of the ingredients you use is paramount in simulating the delicious simplicity that Greek cuisine is famously known for.
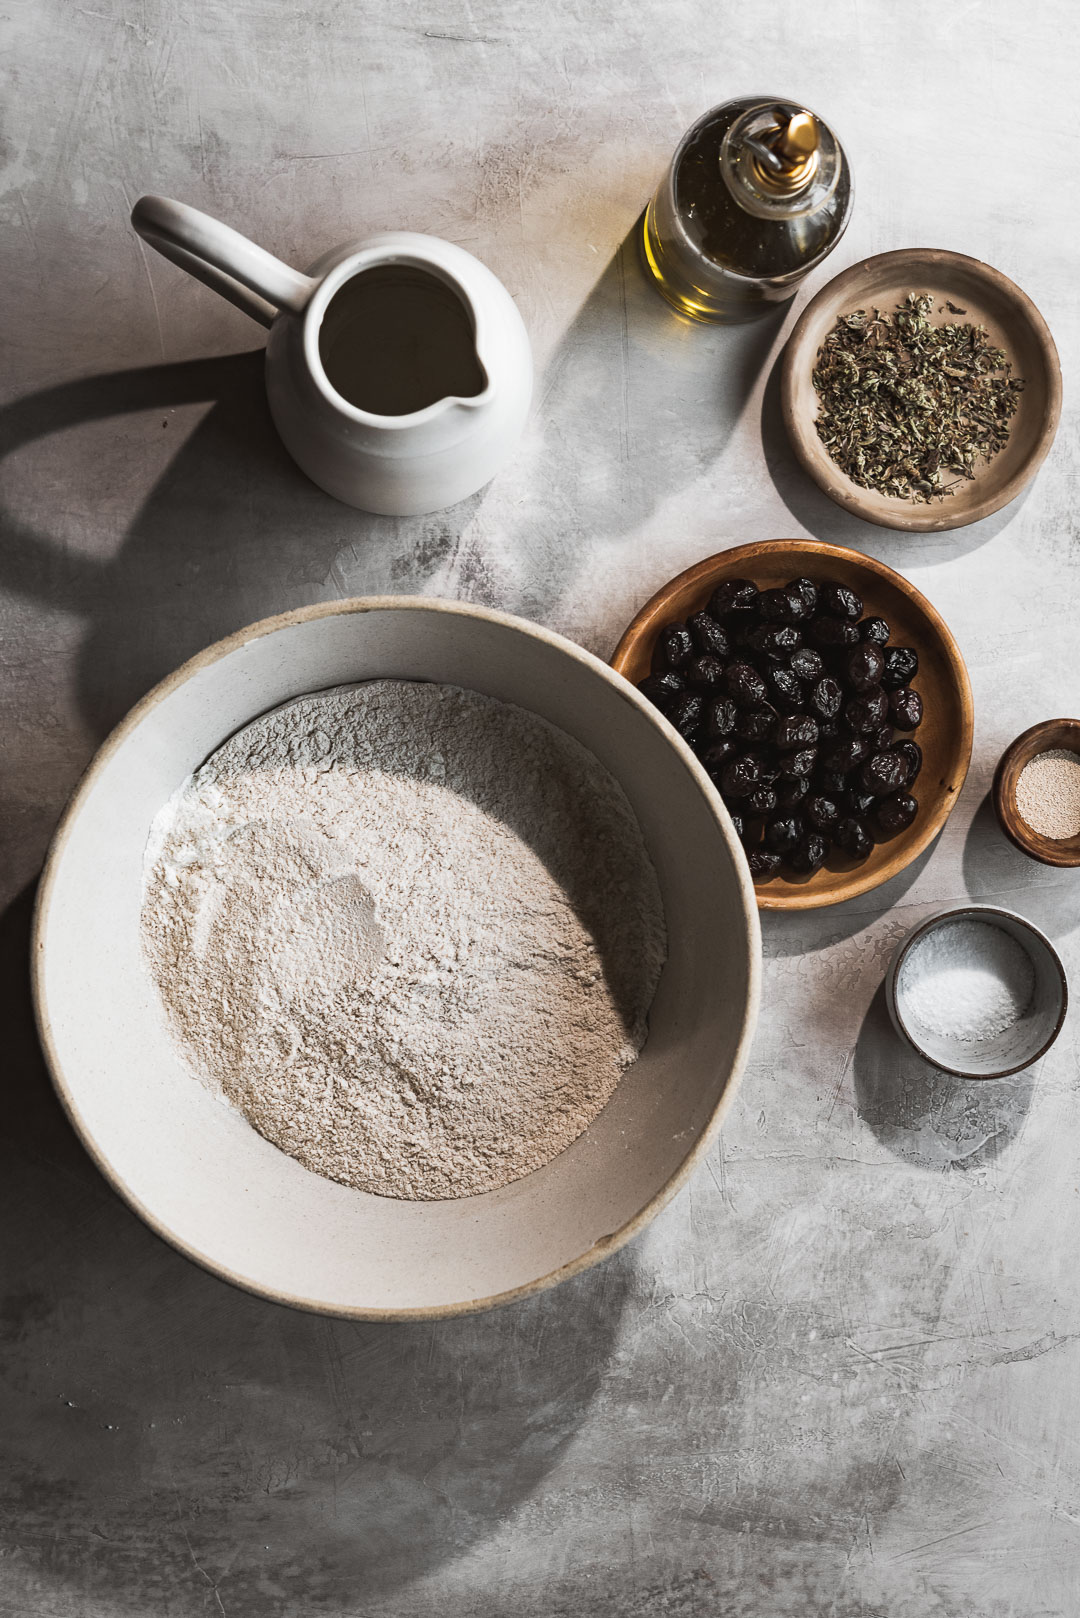
OLIVES:
There is one particular olive that we love most and that is the unique throumba olive from the Greek island of Thassos. My hubby’s paternal yiayia was from the island of Thassos which is renowned for their special olive curing process. Throumba (θρούμπα) olives are small and black, with a very thin skin. They are left on the trees until winter, where they are naturally cured when picked. They require only supplementary dry curing on a bed of coarse salt to create a wrinkled, succulent table olive. With an exceptionally mellow flavor that is dense, fruity & savory. Because they are not vinegar cured you get more of the beautiful, deep olive flavor with a raisin-like texture. Their pits pop right out when you squeeze them at one end. Making them super easy to prep for using in this no-knead Greek olive bread.
If you are not able to procure Thassos throumba olives, I highly recommend looking for naturally cured olives from Turkey or Italy. (we like THESE widely available olives from Turkey). I tend to just tear the olives into halves or quarters while I am pitting them. But you can also give them a rough chop if you want the olives to be smaller in the bread.

GREEK OREGANO:
After the olives, the next distinguishing feature of Greek olive bread is the inclusion of an herb. Different regions in Greece use different herbs for their olive bread. The main herbs used are oregano, thyme or mint. Our favorite herb to use is oregano. But not just any oregano, it must be Greek oregano. Known as “true oregano” – Greek oregano is one of the most incredible herbs in the world. Savory and earthy, the flavor of Greek oregano is the best when it is harvested just before blossoming. One distinguishing element to look for when you are procuring authentic Greek oregano is to look for the little clusters of unopened flower buds. This is a sign that the oregano was harvested at the perfect time and it will have the very best flavor. (we love THIS oregano from Chloe & Daphnis)

MAKING NO-KNEAD GREEK OLIVE BREAD:
The process of making this bread is incredibly simple. On day one, you mix the ingredients into a shaggy dough. Then you cover the bowl and leave the dough to slowly rise for 18 hours. The next day, you pre-heat a dutch oven in a 450°F oven, quickly shape your dough into a round, and bake. I made a process video to example just how easy it is to make our no-knead Greek olive bread:
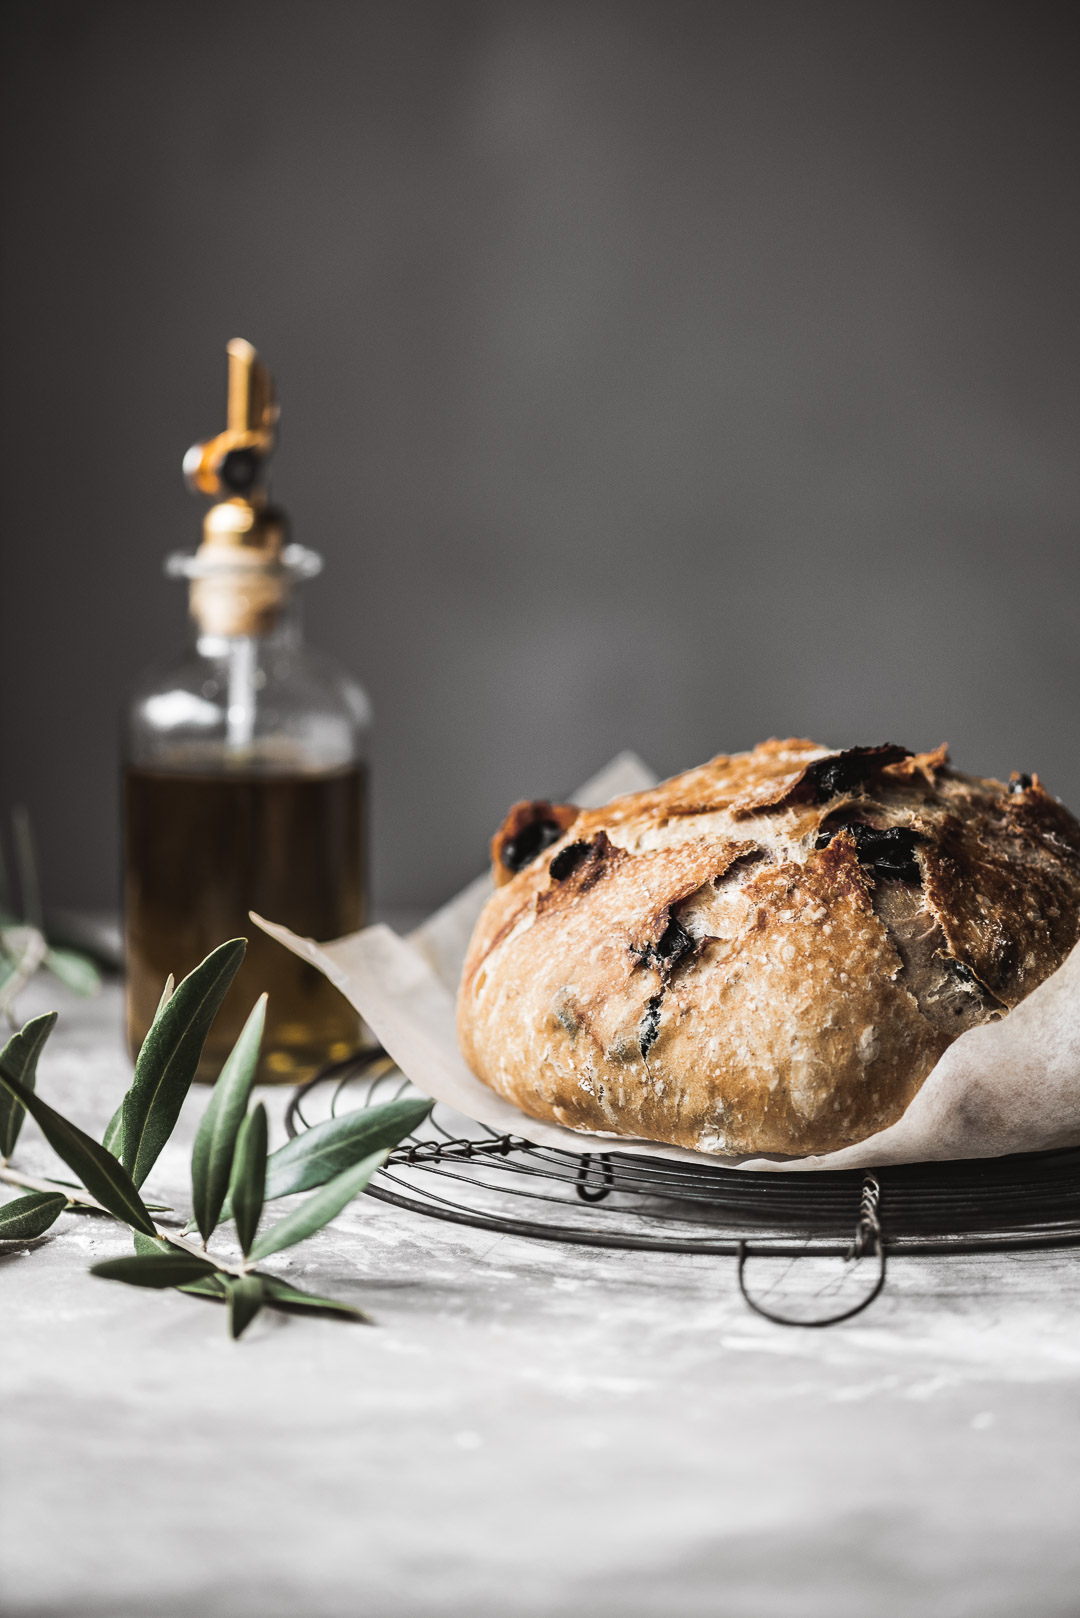
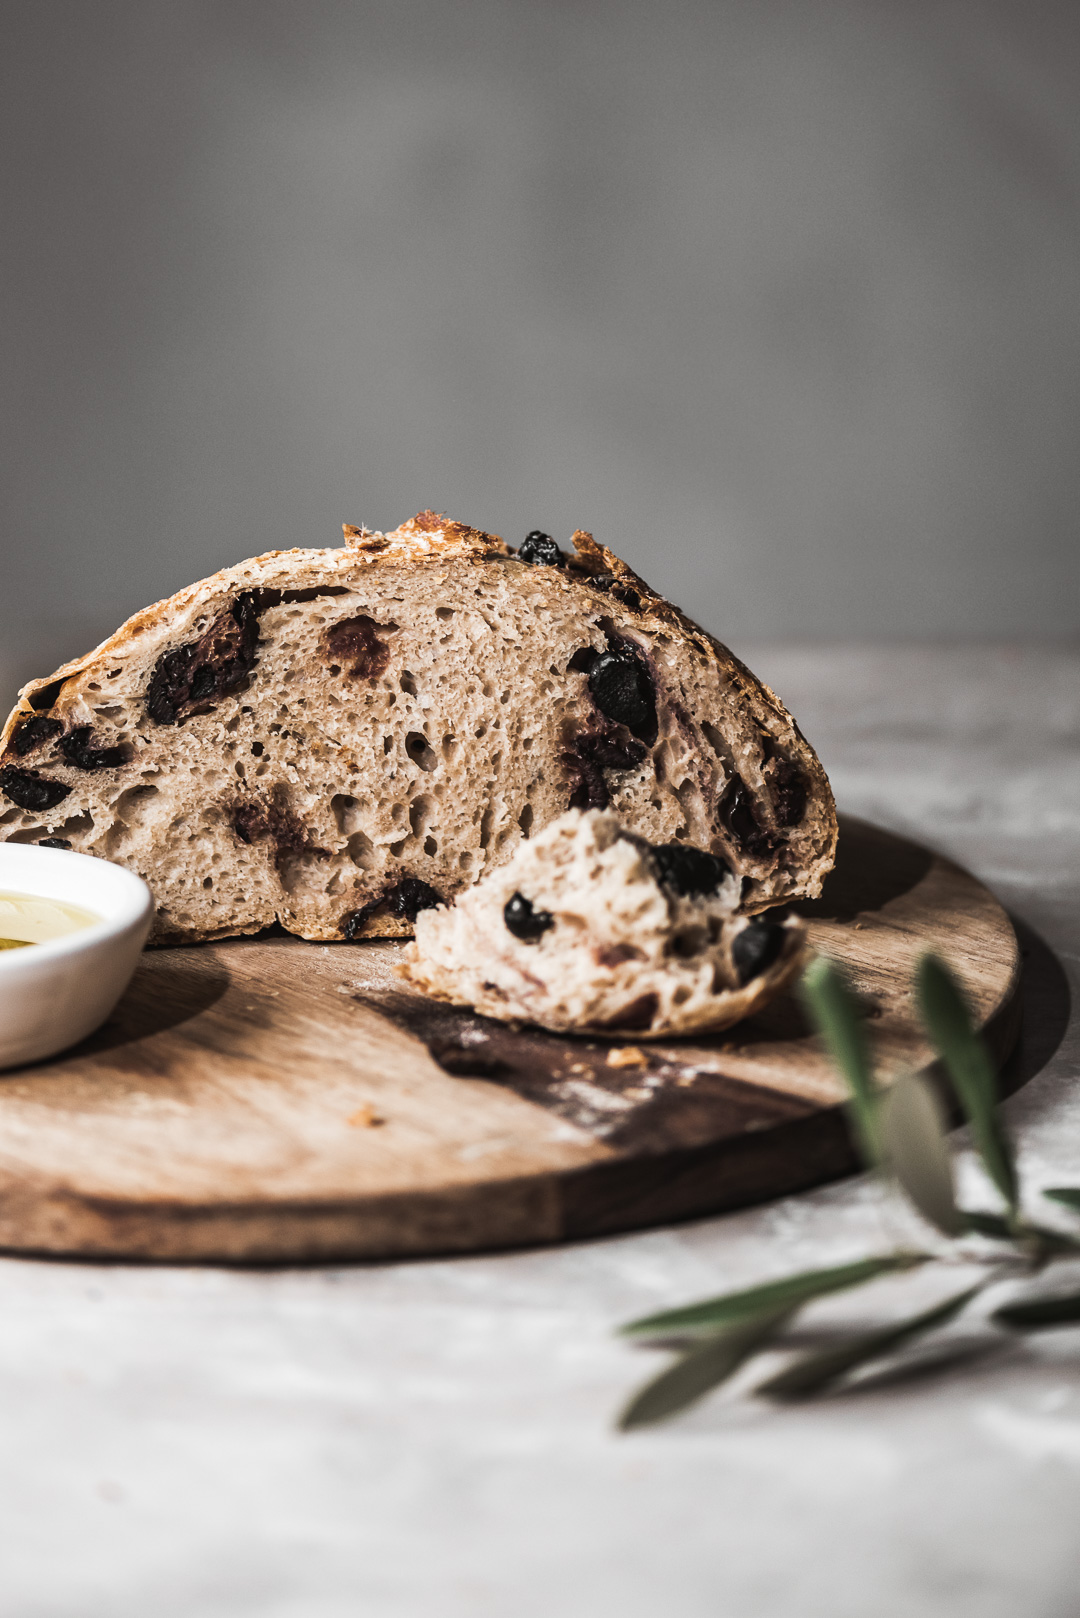
While I am kind of infamous for my sourdough bread recipes, I really wanted to share a recipe for an artisan-style bread that does not require a sourdough starter. In the end result of this impossibly simple loaf is remarkable! A golden crisp crust encases the soft, olive, and oregano laced interior of this most delicious loaf. My favorite thing about this no-knead Greek olive bread is the big reward you get for so little effort.
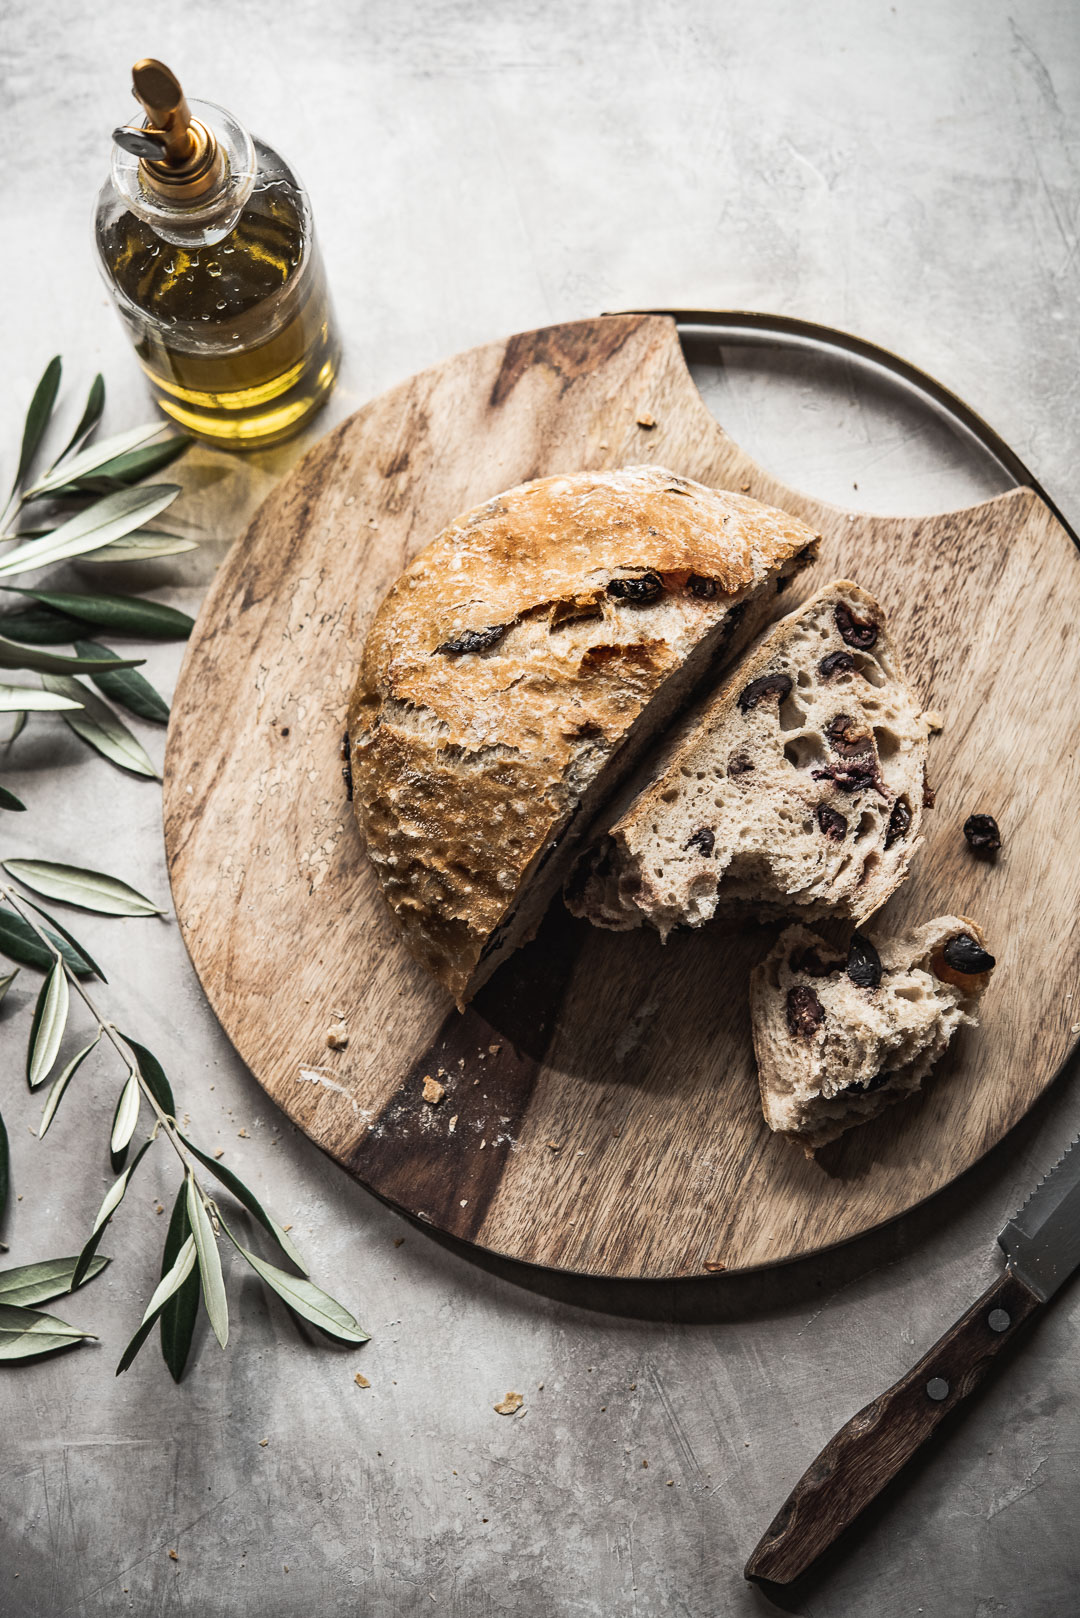
There’s nothing quite like breaking into a fresh-baked loaf of bread. And breaking into a warm loaf to reveal an oregano scented & olive studded artisanal masterpiece is an incredible experience! A true feast for all of your senses…
NO-KNEAD GREEK OLIVE BREAD
- Total Time: 1 hour 10 minutes
Ingredients
- 4 cups (500g) unbleached bread flour or all-purpose flour ( I like to use 375g bread flour + 125g white whole wheat flour)
- 3/4 tsp dry active yeast or instant yeast
- 1 tsp kosher salt
- 2 tbsp dried Greek oregano
- *optional: 2 tsp sugar (adding a touch of sugar accentuates the flavors of the olives)
- 2 cups room temperature water (*if you live in an especially humid region, you may want to withhold 1/4 cup water)
- 1 tbsp Greek olive oil
- 1 cup naturally cured Greek olives, pitted & roughly chopped (if you are using olives with pits, measure your olives before pitting them)
Instructions
- In a large mixing bowl, combine the flour, salt, yeast, and dried oregano (add sugar now if using). Mix the dry ingredients with a wooden spoon or spatula (I like to use a Danish dough whisk) until well combined. Add in the water & olive oil and stir until a shaggy dough has formed. (The dough may seem wet at this stage, but trust the process, it will firm up a bit during fermentation).
- Add in the prepared olives and stir to evenly distribute the olives throughout the dough.
- Cover your bowl with plastic wrap, followed by a kitchen towel. Leave the dough to rest for 18 hours at room temperature (70°F/21°C is ideal)
- Preheat your oven to 450°F/230°C. Place a dutch oven with a lid in the oven on the center rack to preheat while the oven heats. Leave the Dutch oven to heat for at least 20 minutes once the oven reaches 450°F.
- Once the dutch oven is adequately pre-heated, generously flour a work surface and gently let the dough slide out of the bowl onto the prepared surface.
- Lightly sprinkle the top of the dough with flour, and gently fold the edges of the dough toward the center, overlapping each flap of dough with the following fold.
- Flip the dough ball over, so the folds are facing down. Sprinkle the dough with a bit more flour, and gently shape the dough into a ball by rotating and pulling it towards you a few times. Do not knead the dough, just gently coax it until a round shape is formed.
- Transfer the dough round, seam side down, onto a sheet of parchment paper. Use oven-proof gloves/mitts to carefully remove the pre-heated Dutch oven from the oven, and place it on a trivet or on your stovetop. Remove the lid, pick up the parchment paper with the dough on it, and carefully place it in the dutch oven. Put the lid back on and bake, covered for 25 minutes. Remove the lid, and continue to bake for another 30-35 minutes until the crust is deeply golden brown. Let cool on a baking rack & enjoy!
- Prep Time: 20 minutes
- Cook Time: 50 minutes
- Category: BREAD, GREEK
- Cuisine: Greek


To say that this is the greatest loaf I have EVER eaten would be an understatement. This is also only the second bread recipe I have ever attempted so I was speechless with the texture, flavor, and aroma of this beauty coming out of my oven. So grateful for this recipe and I cannot wait to make these loafs again and again to share with my loved ones! So simple, so authentic, such a delight.
Oh Viktoriya! I am beyond thrilled that you fell in love with this loaf! I am so happy that you found it simple and delicious, it really means the world to read your feedback! Thank you so much for taking the time to comment <3 I am honored that my recipe is appreciated by you and your loved ones!
Hi! So I’m not sure what I did wrong but my dough was just too wet even after following precisely your directions. Thoughts? I’m so confused as to what I did. (Twice) :-)
Hello Lisa! The dough will seem very wet when you go to turn it out of the bowl the next morning, but I promise, if you flour your surface and hands well, the dough builds a skin and is easy to work with. If you watch the video again, you will see how wet the dough looks. Also, humidity can be a factor, so depending on where you live and what the humidity is like perhaps holding back half a cup of water would be necessary.
The directions did not say when to add the oil; fortunately, the video showed it. I also only added 1.5 c. of water because otherwise it would have been floating in water. I used the combination of whole wheat and bread flour. I hope I made the right decision not to add all the water. I will find out in 19 hours!
Oh shoot! Looks like I missed when to add the olive oil! Thank you for letting me know! My dough was very shaggy with 2 cups of water, but if you found that you only needed 1 1/2 cups of water it could have to do with the humidity of where you live! I hope all goes well tomorrow! Can’t wait for you to smell & taste this loaf!
This bread came out so delicious!! It reminds me so much of the fresh bread sold in bakeries in the South of Italy. It was so easy to make, thanks to the detailed instructions of Bella! Thank you for taking me back to the places I love through the taste of this bread. 💙
Awwwww! Your comment made me SO happy, truly! I am just delighted that this loaf turned out so well for you and that it transported you to the places you love <3
Delicious! That very wet dough became the most mouth watering, moist loaf. Bot not so moist that I could not also dip in some wonderful Greek olive oil! And those olives…….
YAY! I am so happy that you were happy with the final result! It is indeed delicious as is or dipped in wonderful Greek olive oil! And those olives are truly the best!
I’ve been trying to make bread like this for years! Mine turned out great and the process was very simple and the Dutch oven was key!
Thank you!!
Oh yay! I am SO happy that the bread turned out to your long-sought expectations! Baking in a dutch oven traps the steam and therefore makes for a loftier loaf! You are very welcome :)
I made this recipe, but I am glad I know how to bake! Some people are missing that the dough is supposed to be very sticky and that it will firm up a bit during the long fermentation period. Why not just add these details to the recipe so people are guided? Also, allowing for personal taste, this bread is under salted at 1 tsp kosher salt for 500 g of flour. I have worked in many professional bakeries, and the professional standard is 1 ½ tsp fine salt (such as sea salt) for every 375 (3 cups) flour. And don’t forget to slash the loaf with a utility knife or lame! You do this in the photo, but it is missing from the recipe itself. And now that you know that the oil is missing from the recipe, would you please add it to the instructions? I enjoyed this recipe, but these details will help others as they make the recipe.
Hello Richard. Olives are especially salty and are not a standard ingredient in every loaf of bread. Using the industry standard for salt is not judicious when using salty olives. After testing this bread recipe many times, I settled on the amount of salt you see called for in my recipe. To your point about slashing the bread, I did not slash this loaf as you can very clearly see in the video and not one single picture shows a slash in the loaf. The bread naturally splits a bit on the top while baking. If I had slashed it, the final presentation would have looked quite different. I am very familiar with bread baking and slash my sourdough loaves, but found that slashing is not necessary for this no-knead loaf recipe.
Not sure why the recipe card did not update with the olive oil instruction when I fixed it, but I made sure it updated this time (technology is not perfect). I welcome feedback here on my blog, but please understand that I thoroughly test my recipes. The comment section is meant to be a sounding board where we can all help each other be better. And although I am not perfect, I do try earnestly to support everyone who takes the time to message me here.
I have almost ZERO baking experience and this recipe and instructional video has turned out PERFECT every time we’ve made it, which is usually about twice a week. Perhaps you’re just a bit too braggadocious and/or self exalting about your “professional” baking experience when us “non-professional” newbies are having tremendous success and profound joy and pleasure from the same exact recipe and video that you just “mansplained” into oblivion. And just so we are all enlightened by your highness, exactly WHICH of those “professional” bakers that you graced are adding that much freaking SALT to a loaf of bread that already has SALTY OLIVES in it??? Sounds like the only thing you became a “pro” at was complaining and mansplaining, hey at least you can be credited for coming up with a new compound word richard, “comansplaining”, congrats to you and your legacy!!
Always wanted to make this…thank you for sharing. Your recipes are always spot on! Making it today for tomorrow…and fakis to go with it!
SO happy you are going to make this loaf Zaferia! And it will be so perfect with your fakis!
The aroma permeates throughout our home 🥰 30 more minutes! I had some Einkorn flour and used about 125 g with 375 g bread flour…it seemed pretty wet, but looking at it in the oven now, and it might not survive making it to dinner! 😋 Sending this recipe to all my self proclaimed non baking friends…this is seriously that easy! 😊 Thank you.
First off, THE BEST bread of ALL-TIME,………PERIOD!!!
2nd off,…the smell the smell the smell while it’s baking is MADDENING!!!
3rd off, waiting for it to cool before cutting into it is totally torture!!!!!!!!!
And finally,………the flavor and aromatics and overall experience is definitely a good habit former for sure Bella!!!! A million thank yous from me and my entire family, we greatly appreciate all you do!!!
I finally made this gorgeous bread early this morning (started yesterday afternoon) so it would be ready for lunchtime. The wait is worth it and didn’t disappoint. The flavours, moisture and texture are just amazing. The loaf is already gone and there’s a request for another one for next Friday!
YAY! I am so happy that you made it Sasha and that it was such a big hit! Thank you for sharing your experience with me <3
Hello
I don’t have a Dutch oven…please give me instructions to make just by putting in the oven to bake naked! Thx
Hi Helen! Here are some options for you: place your bread inside a clay pot/casserole dish/any large pot that is oven safe and has a securely fitting lid on it (it won’t be as good as a Dutch oven, but it will be better than not using one). Or you can place a large deep roasting pan or stainless steel bowl, or other oven safe bowl over the loaf set on a baking sheet. Happy baking!