
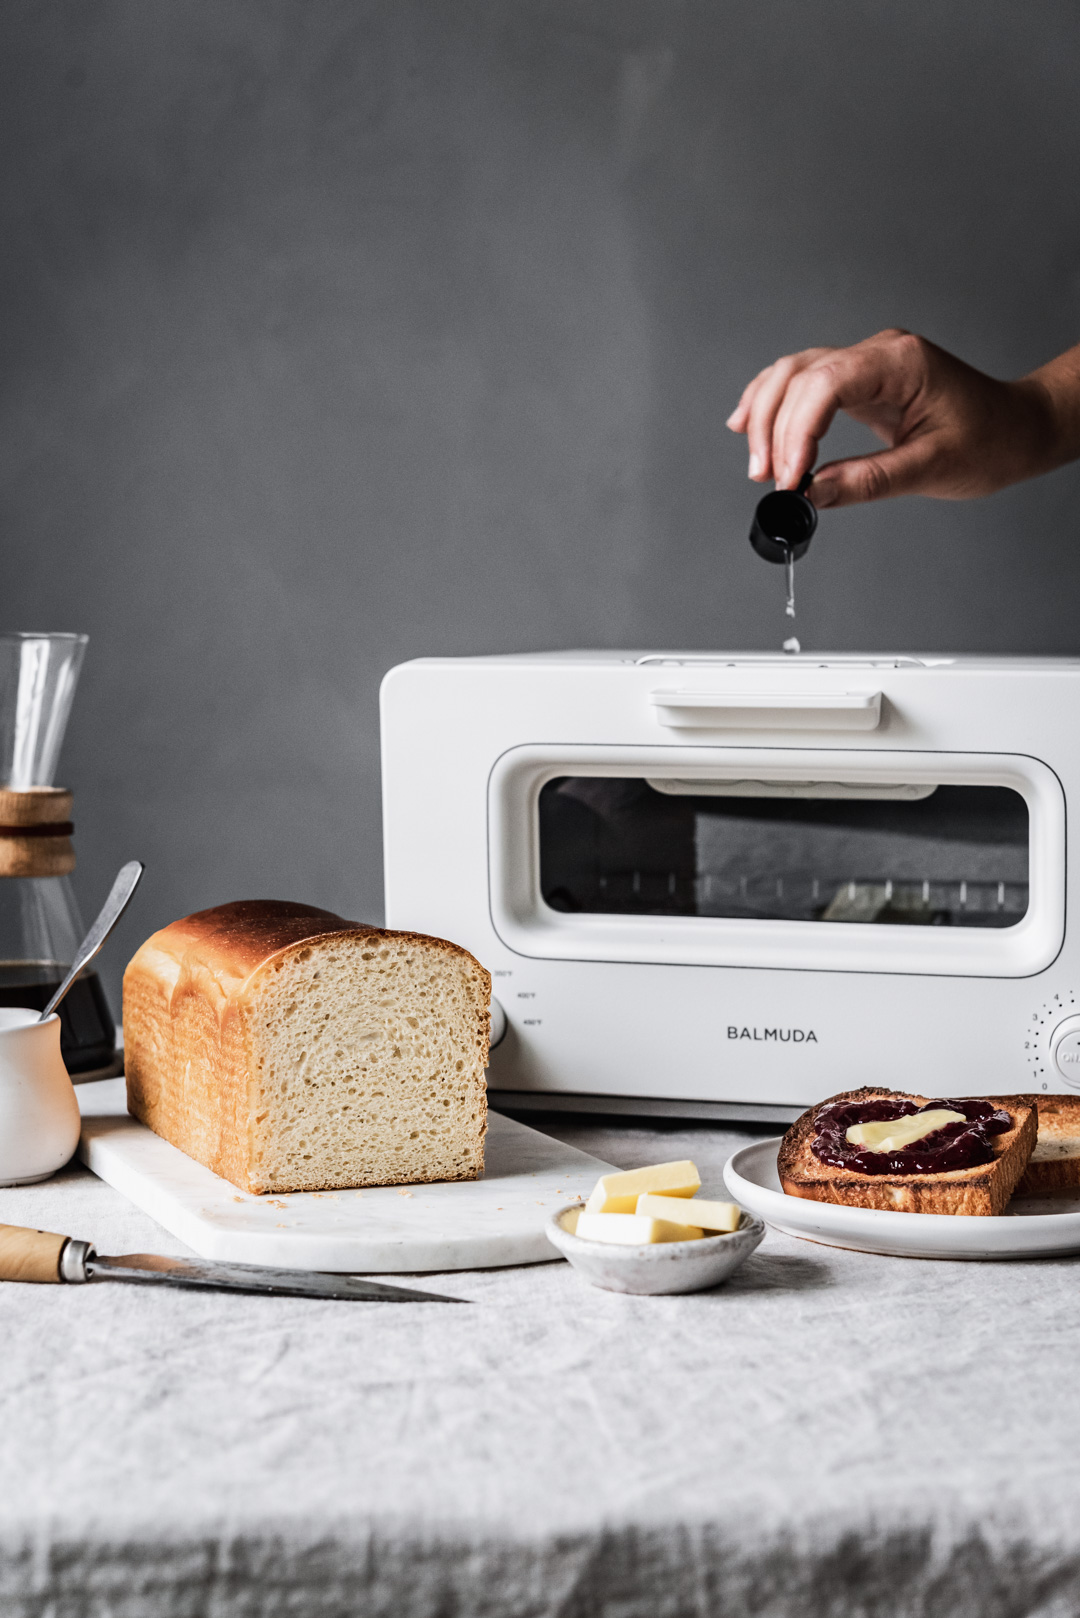
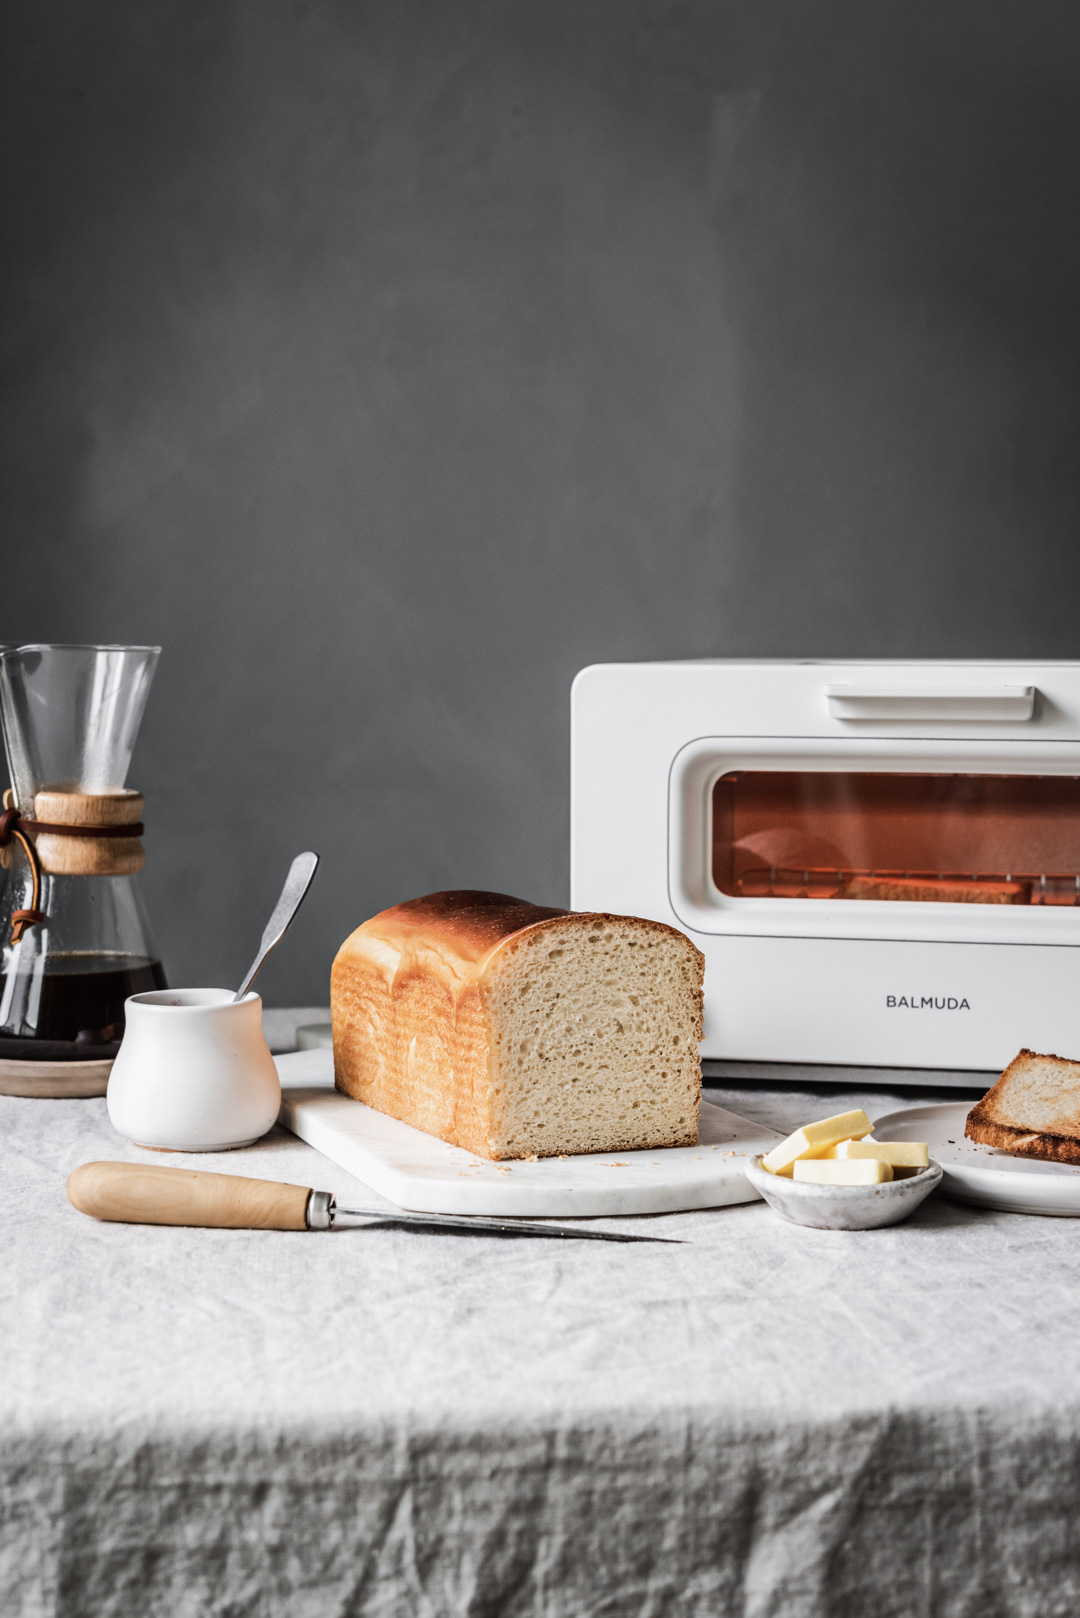
This recipe was inspired by a toaster. Yes, you read that right, a toaster! But not just any toaster, the most innovative toaster in the world! Specifically BALMUDA The Toaster – a groundbreaking toaster that hails from Japan. Since I have the great honor of being a part of launching BALMUDA The Toaster here in the US, I wanted to create a bread recipe that would garner the same kind of excitement that I have for this revolutionary toaster! I knew that Japanese milk bread would be ideal, with its incomparable crumb and buttery taste. And since the world is experiencing a sourdough revival at the moment, it only made sense to create a recipe for Sourdough Japanese Milk Bread.
How BALMUDA has redefined the toaster:
You may be thinking to yourself, how can a toaster be revolutionary? Well, BALMUDA The Toaster has redefined what a toaster can accomplish. The decisive factor is the 5 cc of water that gets poured into the toaster. Because water heats more rapidly than air, a thin layer of steam envelops the bread, lightly toasting its surface, while keeping its inner moisture and flavor from escaping. The combination of steam technology along with precise temperature control allows BALMUDA The Toaster to create superb contrasts of flavor and texture for every kind of bread: crisp and savory on the outside, moist and fluffy inside.

The perfect bread for the perfect toast: Sourdough Japanese Milk Bread
Now that you understand the hype behind BALMUDA The Toaster, its time for you to understand the greatness of this Sourdough Japanese Milk Bread! If you have not taken the leap into sourdough baking, I cannot recommend it more highly! It seems that more people are baking with sourdough now than ever due to worldwide shortages of commercial yeast. What most people end up discovering when they embark on their sourdough journey is a deep love for the art of baking with wild yeast! Harnessing the natural power of flour, water, salt & patience to create all manner of baked goods is one of the most satisfying endeavors you can pursue! As is the case with this Sourdough Japanese Milk Bread. With a superbly fluffy crumb and the most wonderful flavor, it is one of my favorite sourdough breads to bake! And while this bread is super soft & fluffy after it gets baked in a conventional oven, toasting a slice of it with BALMUDA The Toaster is even better!
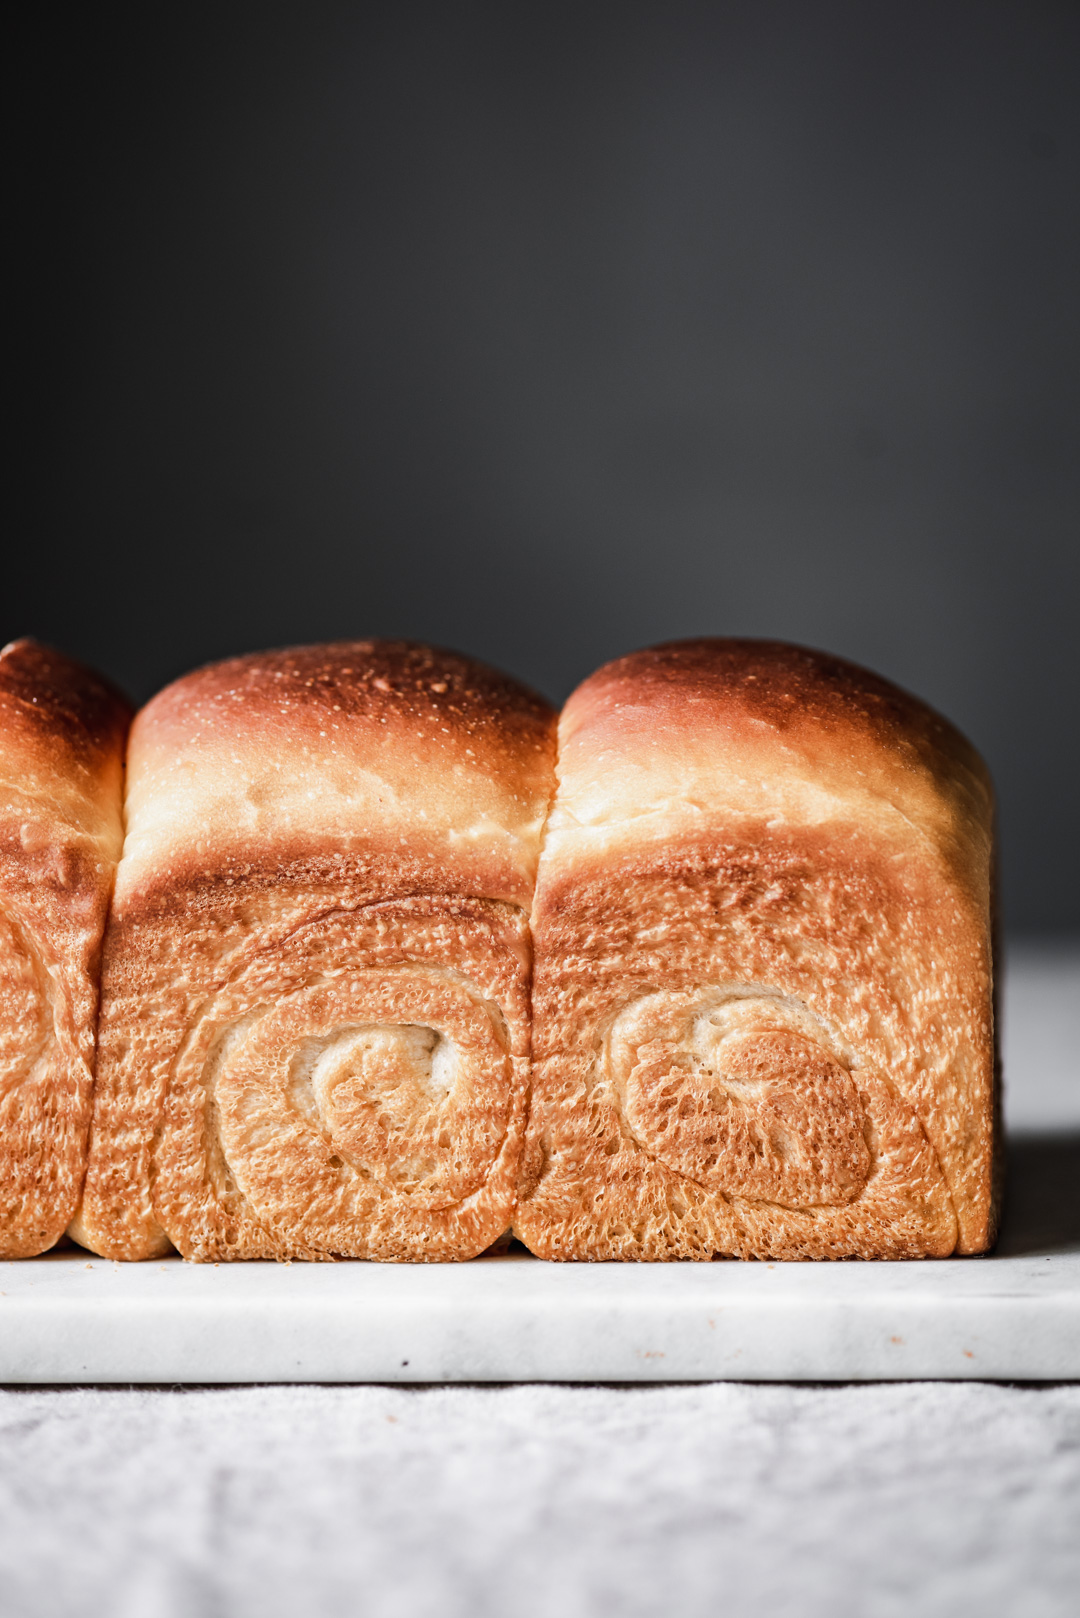
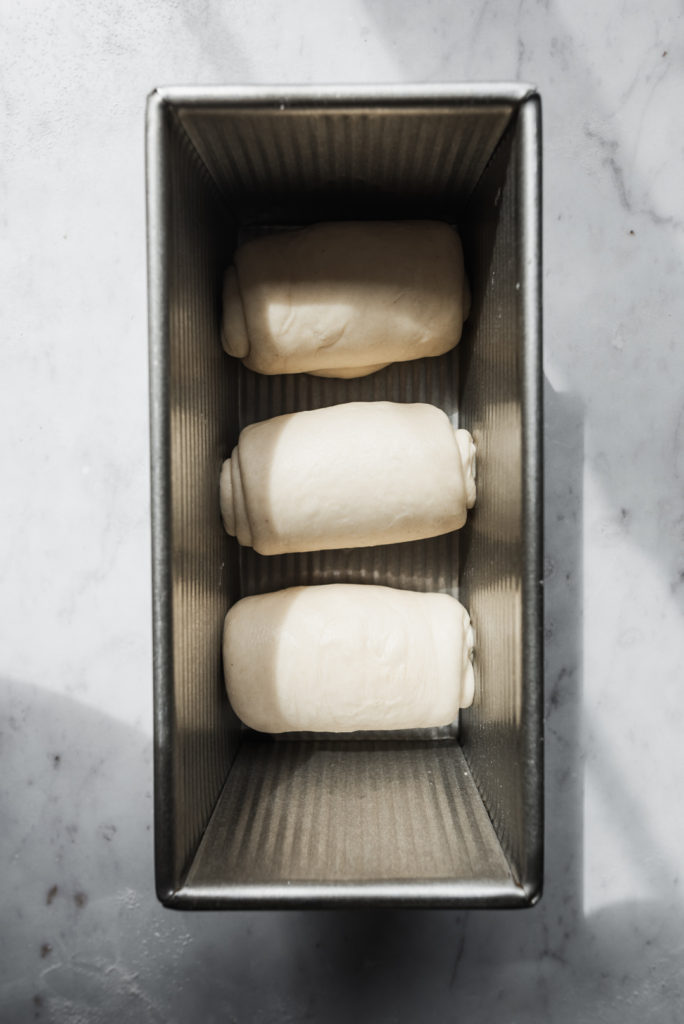
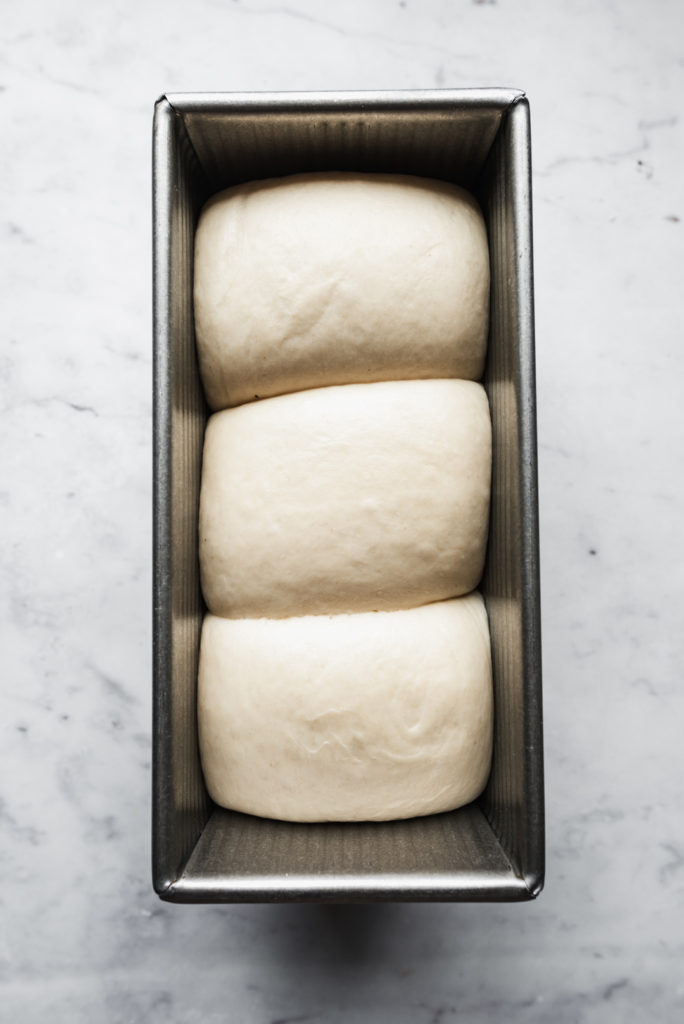
One of the signature characteristics of Japanese Milk Bread is its unique shape. The dough gets divided into three sections and then rolled into thin ovals with a rolling pin. These thin ovals of dough then get rolled up into coils. You repeat this process one more time before adding your dough coils to your bread pan to rise. *If you want to achieve the classic Japanese milk bread shape with super straight edges, then I recommend you use a Pullman loaf pan.
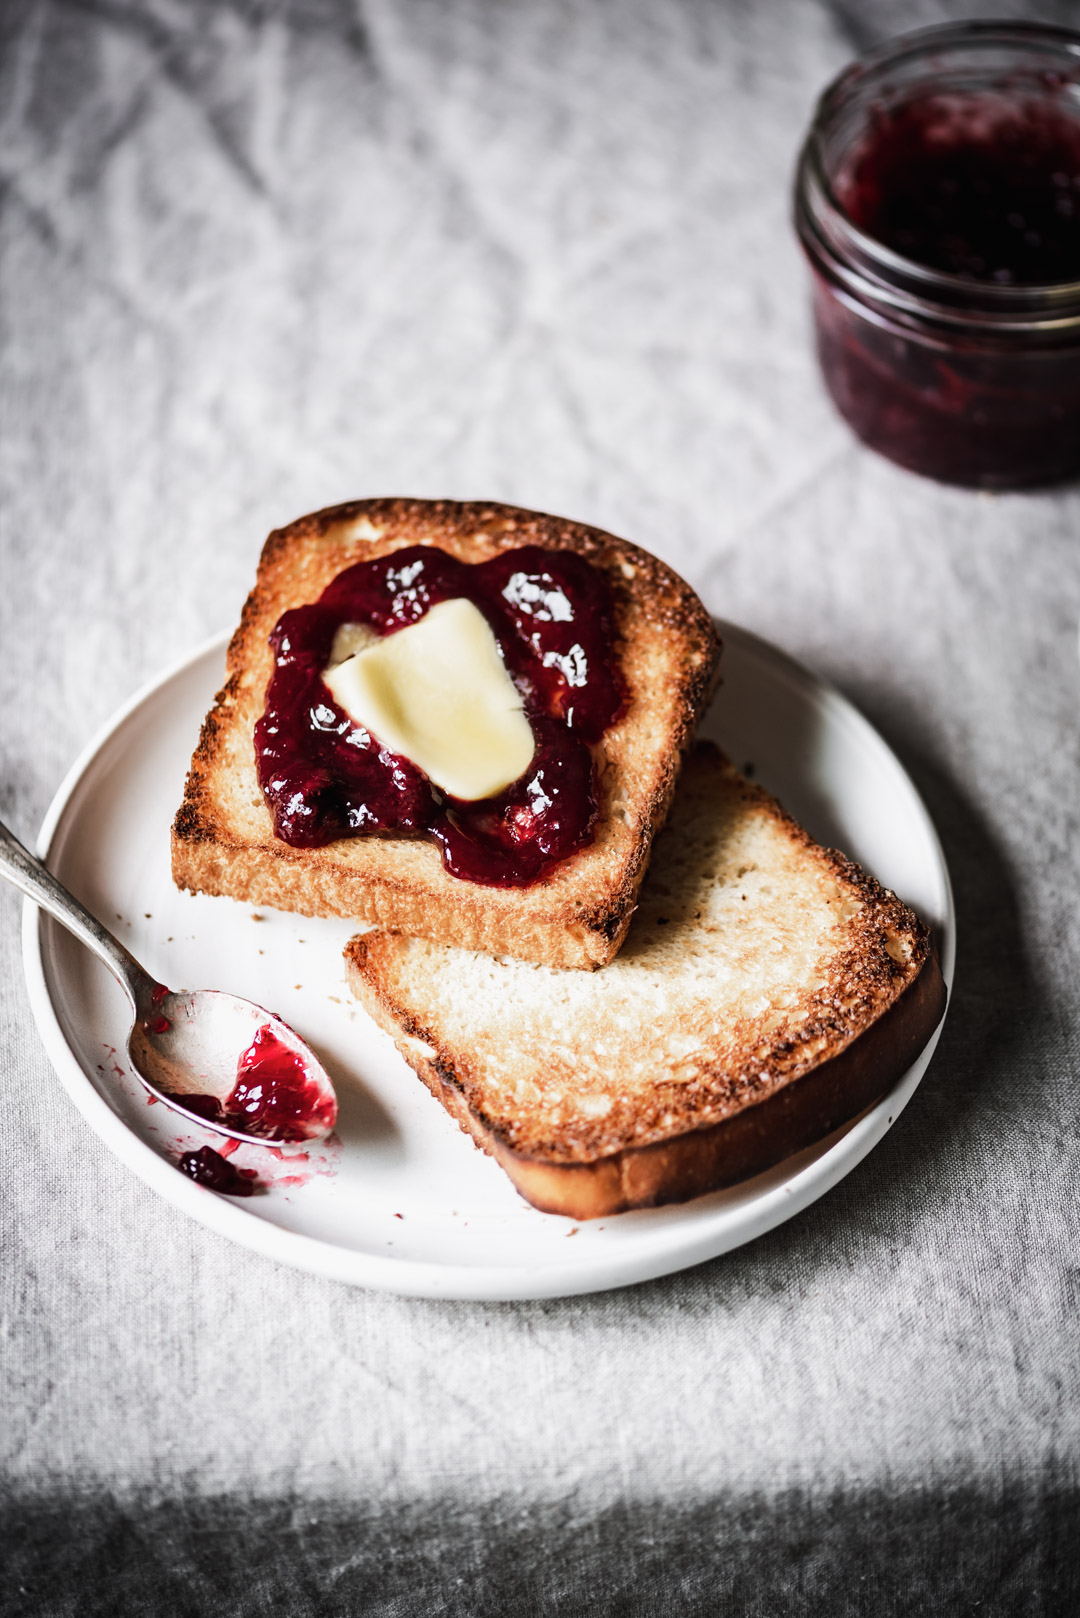
The art of toast:
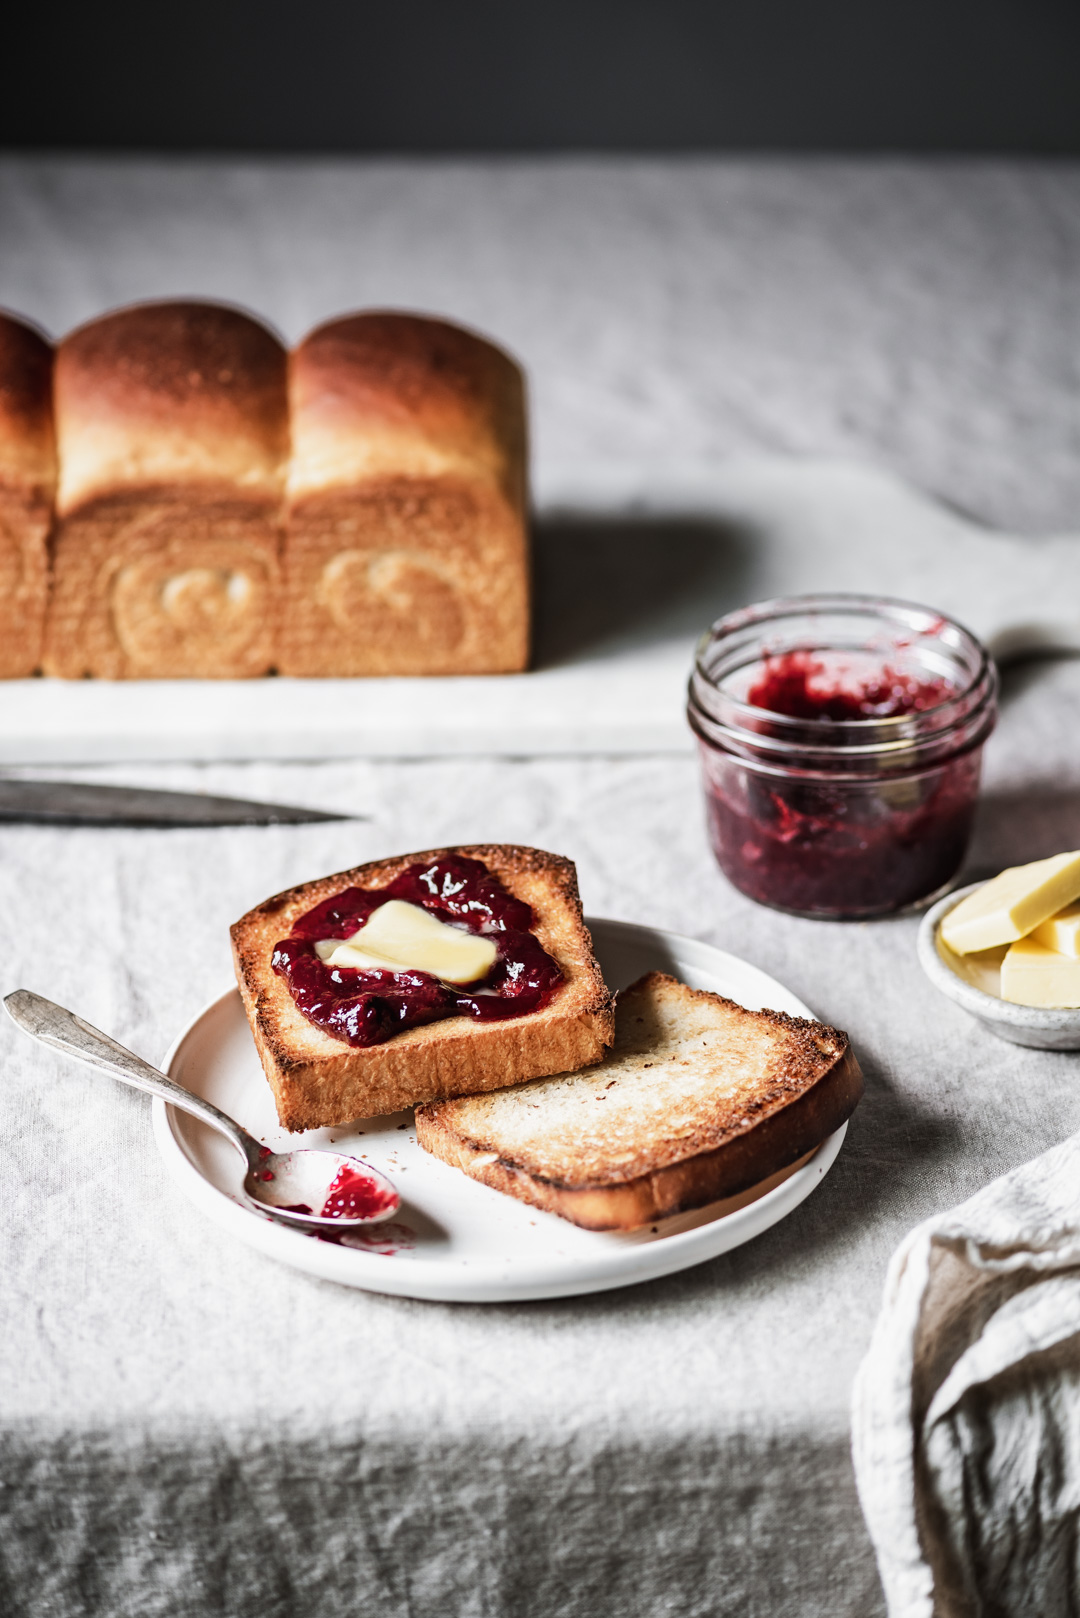
Toast comes in many different forms, but there is something so perfectly satisfying about a simple slice of toast topped with butter and jam. While you can eat your Sourdough Japanese Milk Bread as is, toasting it really brings out its full flavor and texture. When I tasted my first slice of Sourdough Japanese Milk Bread toast from BALMUDA The Toaster I was blown away! Not only was the exterior perfectly golden, but the contrast between the crisp exterior and the moist and fluffy interior was absolutely magnificent! When I initially read about BALMUDA’s mission to create appliances that deliver a thrilling and wonderful experience, I was intrigued but honestly skeptical. I thought to myself – can using a toaster really be a moving experience that sparks joy? And the answer that I came to find out was, yes it can!
If you’re looking for a sourdough bread recipe that evokes cozy memories of super-soft, lofty white bread that transforms into the very best toast, then this Sourdough Japanese Milk Bread is just what you need. And to learn more about all of BALMUDA The Toaster’s abilities, click HERE.

SOURDOUGH JAPANESE MILK BREAD
- Total Time: 1 hour 20 minutes
- Yield: 12 slices 1x
Ingredients
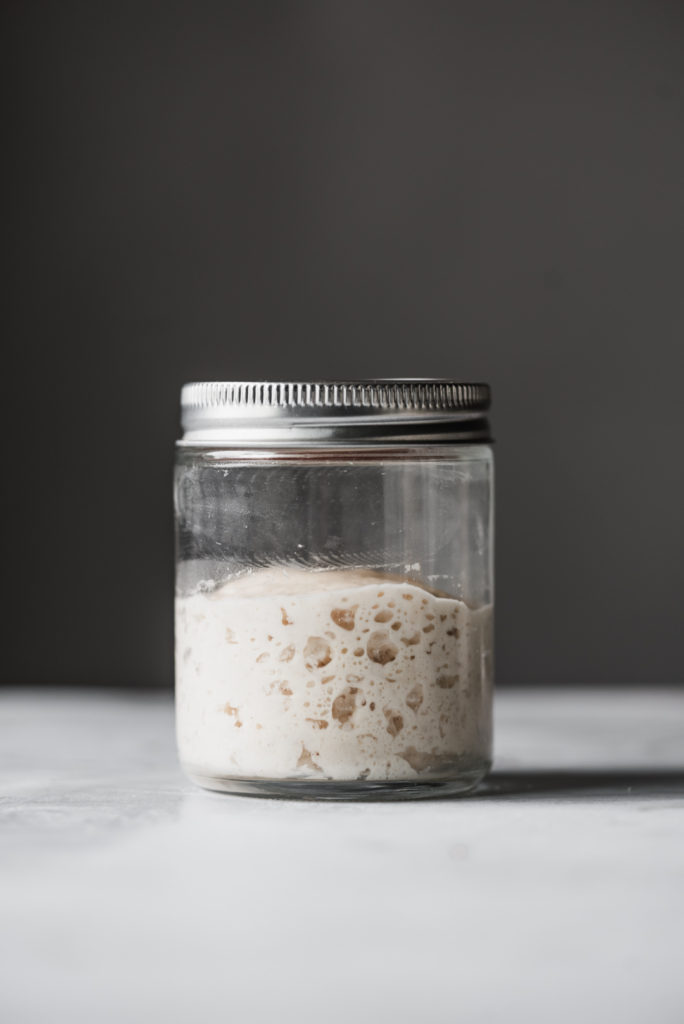
FOR THE LEAVEN:
- 15 g ripe sourdough starter (at 100% hydration)
- 25 g water
- 40 g bread flour
FOR THE FINAL DOUGH:
- 290g flour (I used 50% all purpose flour & 50% bread flour)
- 25g sugar
- 30g butter, softened
- 2 large egg whites (about 60g)
- 5g salt
- 140g milk, at room temperature
- All of the leaven
Instructions
DAY ONE:
FOR THE LEAVEN: (start in the morning)
- Mix together your ripe sourdough starter, water & bread flour and let ripen at room temperature (73-75°F) for about 12 hours.
FOR THE FINAL DOUGH:
- Mix together the flour, sugar, milk, egg whites and leaven until just combined. Cover and allow this mixture to rest (autolyse) for 30 minutes.
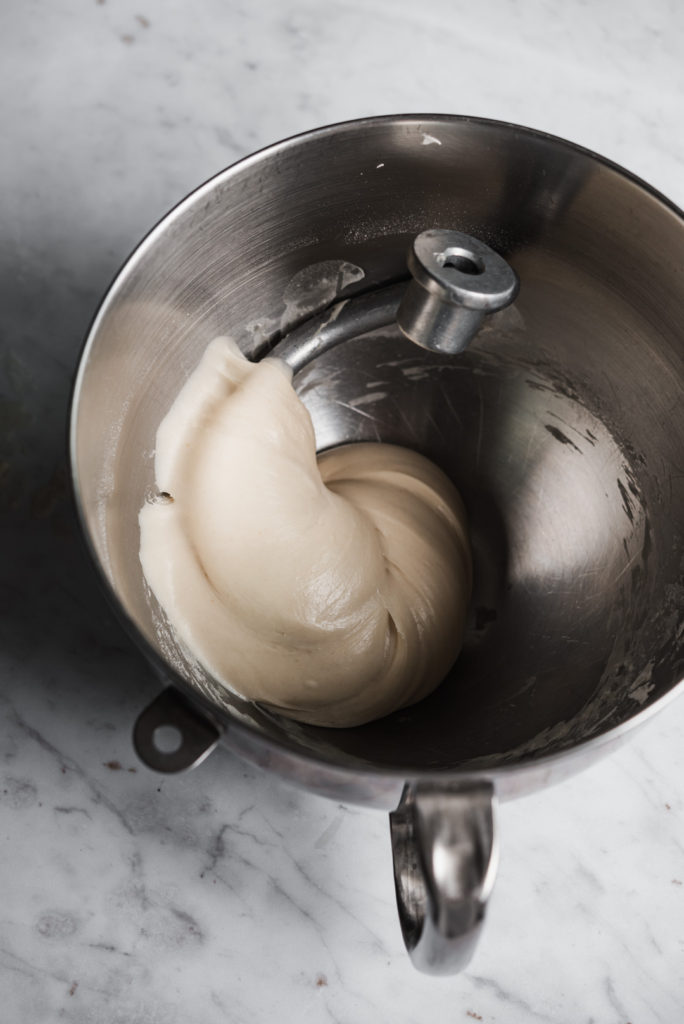
- Once the dough is done resting, add in the salt and knead the dough until the gluten is moderately developed. When the dough comes together and starts to feel smooth and stretchy, add the butter in two additions, mixing the first addition in completely before adding in the second.
- Continue kneading until the gluten is very well developed and the dough passes the windowpane test as pictured above. The windowpane should be very extensible. It should stretch super thin but should also be very tough to break. When you poke a whole in the windowpane it will have smooth edges. Getting to the windowpane stage will take quite some time (15-20 minutes in a stand mixer), even longer if done by hand.
- Transfer the dough to a clean, lightly oiled bowl. Cover the bowl and allow the dough to rise at room temperature for 2 hours. After 2 hours, the dough will have expanded, but not doubled in size.
- Fold the dough into itself, cover the bowl tightly with plastic wrap, and refrigerate overnight.
DAY TWO:
- Take the dough out of the refrigerator and transfer it to a lightly floured surface.
- Divide the dough into 3 equal parts (I use a kitchen scale to get perfectly even portions) and lightly shape each portion into a ball. Cover with lightly oiled plastic wrap and allow to rest for one hour.
- After the hour, use a lightly floured rolling pin to roll each dough portion into an thin oval and roll up into a coil. Rest the coils for 10 minutes before rolling each piece into an oval again, seam side up. Re-roll each oval into tight coils.
- Transfer the coils to a non-stick loaf pan, seam sides down. Cover the loaf pan loosely with plastic wrap and allow the dough to rise about 6 hours at room temperature. The dough should be super puffy and have risen, to fill almost to the top of the Pullman pan about 90% (*if using a standard bread pan, allow the dough to rise to just before the top of the pan).
- 1 hour before baking, preheat your conventional oven to 400°F. Once the dough has finished rising, transfer the pan to the conventional oven and bake for 20 minutes.
- After the initial 20 minutes, reduce the oven to 350°F and continue baking for 15-20 minutes (the internal temperature should be at least 195°F). *If your loaf seems to be browning too quickly, tent it with a piece of foil to prevent it keep from burning.
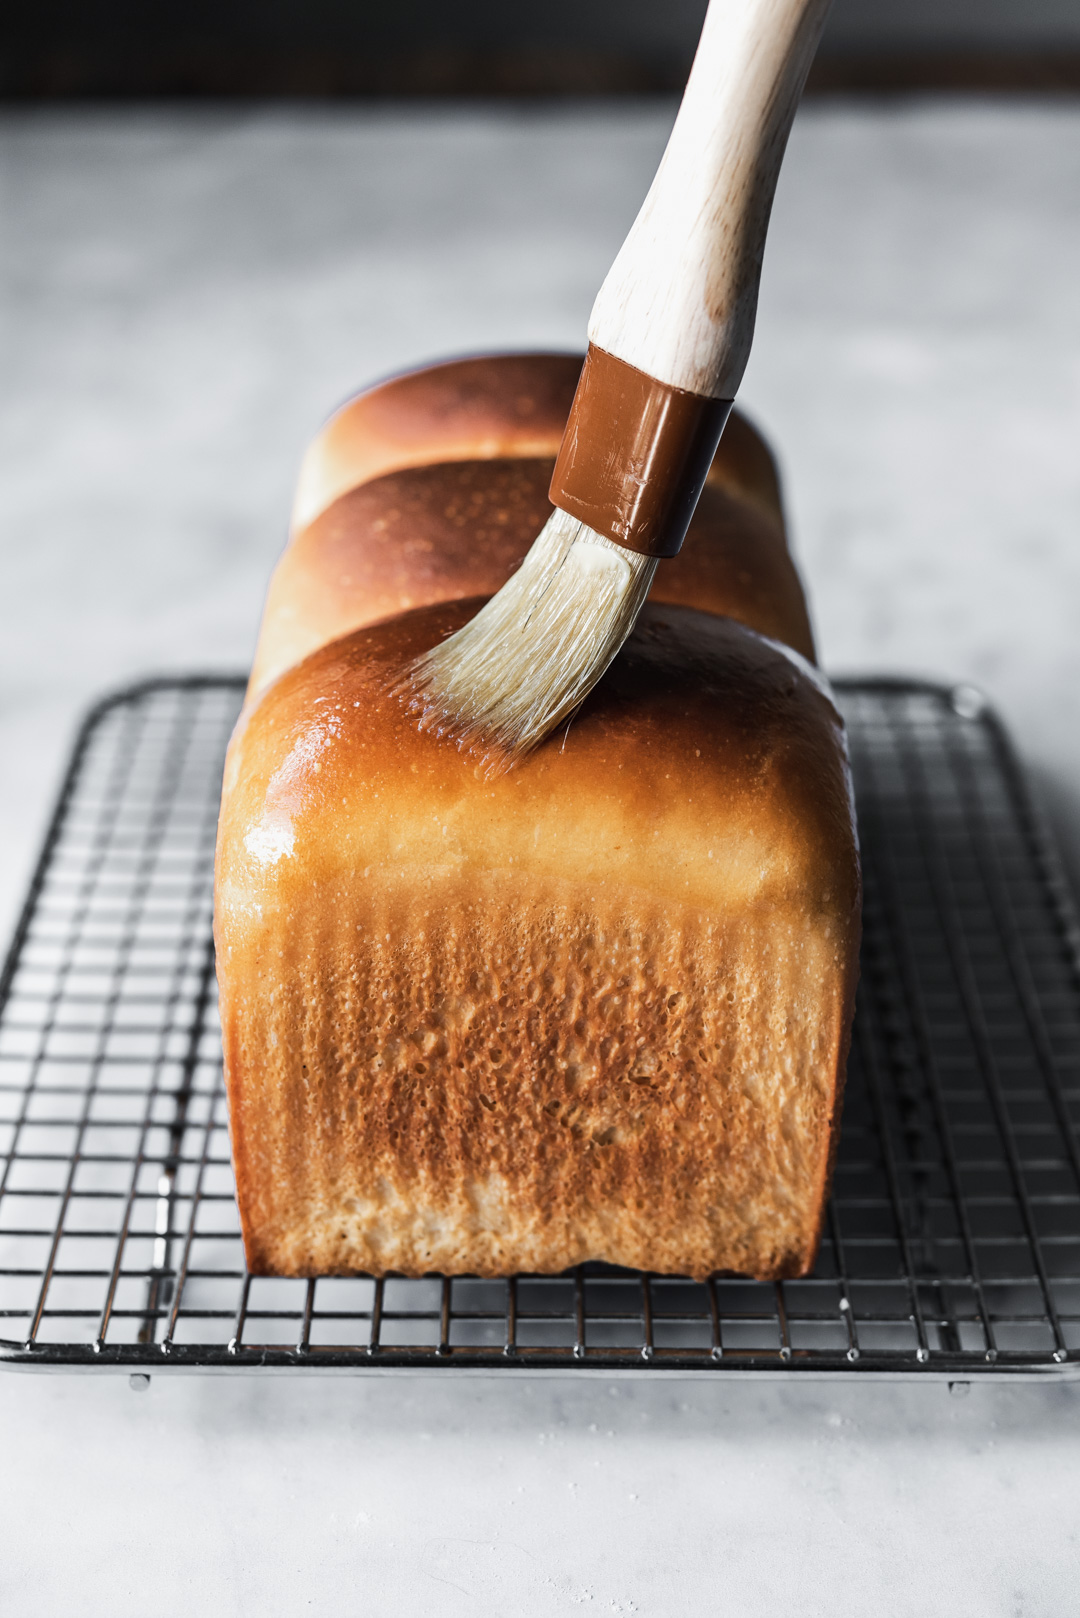
- When the loaf is done baking, turn it out of the bread pan and allow it to cool on a rack. Brush the top and sides of with melted butter while the loaf is still warm. Allow the loaf to cool before slicing.
TO MAKE THE PERFECT TOAST:
- Toast 1/2″ slices of bread in your toaster (*BALMUDA The Toaster if possible ;) and top with your favorite jam & then a dab of softened butter gently spread into the jam. Enojy!
- Prep Time: 45 minutes
- Cook Time: 35 minutes
- Category: Bread
Nutrition
- Serving Size: 1 slice
This post is in partnership with BALMUDA. As always, all opinions expressed are purely my own. Thank you so much for supporting the companies that support this blog.


This bread couldn’t look more perfect! I’ve heard of milk bread, but sourdough milk bread? Omg! I can’t wait to try this!!!! I swear by your sourdough bread making guide so I know this is going to be a winner too!
Awwww! Thank you so much Tina! That means so much! I can’t wait for you to try this super soft loaf!
Love love love making your sourdough bread! I am going to try this milk bread – but what does it mean that the starter is at full hydration?
It means that the ratio of water to flour in your fed starter is 1:1 !
Just as Alexa said! It means you have a starter that is fed equal amounts of flour & water! So happy you love making my sourdough bread!
This recipe and these photos are EVERYTHING!! I want a Pullman pan very badly now haha. Did you do an egg wash to get that beautiful brown color?
Hello Alexa! No egg wash necessary! The milk & butter in the dough yields a gorgeous brown crust! Simply brush the exterior of the loaf with butter when it comes out to make the crust glossy and make it nice and moist!
Really a great recipe. The bread is super soft and chewy. Will definitely remake for my family. I always want to make Japanese Milk Bread in Sourdough and for sure this is a good recipe and steps are clear and easy to follow. Thanks a lot❤️
Thank you SO much Pauline! I am really happy that you were finally able to make a sourdough Japanese milk bread and that my recipe worked so well for you!
I just baked this for my family and it turned out perfectly! The recipe was incredibly easy to follow and the loaf came out soft and fluffy and with just the right amount of tang to keep the kids happy. I will keep this one on rotation. It was delicious fresh and even more amazing toasted for breakfast! Thank you!! Love your recipes.
YAY! I am SO happy that this loaf was a hit for you and your family! And yes, I have to agree, this bread is even better toasted! So honored that you love my recipes <3 I appreciate you taking the time to let me know!
I notice you wanted a 100% starter and then the ratio of water to bread flour is not the same. 15g to 25g of water to 40g of flour. Is there a reason to make a stiff levain rather than a 100% hydration liquid levain?
The benefit of building a stiff levain for an enriched bread like my milk bread is that it produces a more subdued acidic taste in the final loaf.
I just made it! It is soooo good! I love Japanese milk bread, but the commercial ones have some weird ingredients in there. And I love that this one is a sourdough. Thank you for this genius recipe!
Oh yay! I am really happy that you enjoyed my recipe so much! You are so welcome :)
Hi dear, I m just trying to use your recipe for making milk bread. But if i use the sour dough starter discard, is still ok for the fluffiness of the texture? As I don’t wanna waste the discard and seems it’s not too sour compared with the sour dough starter. Also, from yr recipe, there’s no dry yeast. Is there enough just using starter discard for fermentation? Thanks!
Hello Amy! I have not tried making this recipe with sourdough discard, so I would not suggest that you try making this recipe with discard! There are SO many awesome ways to use discard (sourdough pancakes are one of my favorite ways to use it). But generally speaking, I recommend keeping and maintaining a smaller sourdough starter so that you do not always have discard on your hands. Discard is basically sourdough starter that has reached its peak activity and subsequently deflated. A freshly fed, peak activity starter is going to be less sour than discard and is what is needed for this recipe to rise with natural fermentation. An active starter is all you need to make this loaf rise, no dry yeast is necessary!
How about transforming this recipe slightly to become Sourdough Japanese Raisin milk bread. I love raisin bread toast in the morning. Would you recommend and if so what does it do to the process? Thanks…
You absolutely could do that Jean! I would adapt my recipe to add in the raisins & cinnamon sugar at the shaping stage, as they do in this King Arthur recipe: https://www.kingarthurbaking.com/recipes/cinnamon-raisin-sourdough-bread-recipe
The rise time should remain the same, and then baking time should be the same as well! Good luck and happy baking!
Hi, what is the size (width x length x height) of your Pullman loaf pan? Thank you!
Hello Annie! The pullman loaf pan I used for this recipe measure 9x4x4 inches! Here is the link: https://www.amazon.com/dp/B00DUF1TUW/
Hi, i read that sourdough recipes should preferably be kneaded by hand instead of standing mixer, would you say it is is true?
I would not say that one way is better than the other – they are simply different. When it comes to baking artisan sourdough loaves, learning what the dough should feel like is an important element in understanding sourdough. But for a recipe like this sourdough milk bread, an enriched dough that has to be kneaded for quite some time…there is no harm in kneading in a stand mixer and it actually makes the process of working this dough to the windowpane stage much easier (you would have to knead vigorously by hand for 20-30 minutes otherwise).
Thank you for your reply. I could not reach windowpane stage after very very long on mixer around 25-30mins. I ran it on low speed 1-2. Is that why? What is the recommended speed to do this? It still felt sticky and it drips a little when dough hook was lifted. Thank you!
Hi, i followed the recipe but replaced milk with kefir. At kneading phase, i used mixer (dough hook) for 25mins and see no windowpane, so i started Hand kneading 20mins. Smoother and less dough after such a long kneading, but still no windowpane. Went ahead and followed your recipe anyway. Bread turned out nicely risen, and tastes good too. However, it has no visible holes like yours in picture posted.
Can you advise which part of The process caused this? Thank you in advance!
You probably need to set your mixer to 2-3 to allow the dough to knead more vigorously. Also, replacing the milk with kefir will definitely have an effect on the texture of the bread. I have never used kefir myself, but because you did make an adaptation it clearly had an effect on the dough. I would try making it as the recipe is written next time and setting your mixer to speed 2 or 3 for the entire duration of the mixing. You should notice it reach windowpane in 15-20 minutes.
Great! Thanks for the quick reply. Will try again :)
You’re very welcome :)
You’re very welcome! Happy baking!
This was the perfect bread for our katsu sandwiches! My starter was already ripe and I made a last-minute decision to make the leaven. It only sat for 6 hrs and I still got a good oven spring. Highly recommend. Thank you!
Oh yay! So happy that you made my recipe and katsu sandwiches sound SO good right now!
Hi, do i have to refrigerate it overnight? Or minimal number of hours? Mine will proof by 1230pm and im out tomorrow.. Will it work if i bring it out to bake tonight? Thanks!
Hello there! I have not experimented with other proofing methods, so all I cannot advise you on how it will turn out if you vary from the recipe instructions :)
I have put this in the fridge at various stages, before shaping and after shaping, and also for varying amount of time, to accommodate my schedule. I have found this to be quite resilient. If I leave it too long, it does develop more of a sour taste (which is not bad!) that is easily masked by jam or condensed milk. One of the many reasons why I love this recipe!!
Oh yay! I am so happy to hear how resilient this recipe has been for you! And yes, the longer you leave the dough before baking off, the sourer it will taste, but it can be quite pleasant! SO happy you love this recipe!
Hi can you advise me why the dough is super sticky and Hence unable to roll with rolling pin to form the coil as it keeps sticking to the rolling pin. Thanks
Hey there! I tested this recipe several times and never experienced the dough being super sticky…did you end up refrigerating the dough overnight or did you do it for less time as you indicated in your last comment?
Hi,
Why don’t you use whole eggs?
Hello Hisa! The reasoning behind only using egg whites is that they are neutral in flavor and contribute to the leavening of the bread. Whereas egg yolks are rich in flavor and yield a richer texture as well.
Other Japanese Milk Bread recipes use tangzhong but yours does not… how does that effect the outcome? I’m all for skipping that step if it makes no difference!
Hello Ann! While developing this recipe, I found that the use of tangzhong was not necessary to produce that iconic milk bread crumb and texture. I believe that the use of sourdough starter in my recipe negates the need for tangzhong because the gluten has been given time to develop while the stiff starter is fermenting!
I absolutely love this bread! I’ve baked it four times.
For the last two times I tweaked the recipe a bit.
I decided to use Kefir milk instead of regular milk as I had a lot and I also added chia seeds to the dough. Thanks for sharing it!
I am SO happy that you love my recipe! And how neat that you have found some ways to mix things up and make it your own!
Hello!
Thank you so much for this recipe. I had great fun making it and the end flavour was so good.
However, I am a complete amateur and have never made bread before. I ordered a sourdough starter online specifically to make this. But it didn’t rise at all. I’m not sure what I did wrong. :(
I am SO happy you enjoyed this recipe! All I would say is that you may need to develop your sourdough starter a bit more before baking with it. Not sure how many times you fed the starter you purchased, but making sure that the starter is super active is crucial!
Hi —
Making this right now!
I didn’t time it right and don’t want to stay up until 2 am for the last rise — can I put the last rise in the fridge over night? (when they’re in the pan)
Thanks!!
Yes! That should be fine! You will just need to let the loaf come to room temp and rise fully before baking!
Have you tried the recipe with whole wheat bread and all purpose flours? What adjustments would you suggest?
Hello Lamarr! I have not tried incorporating whole wheat flour into this loaf as the traditional Japanese milk bread is a white loaf. However, my friend Ruth has a great whole wheat soft sandwich loaf recipe that you may want to try: http://cooktildelicious.com/100-whole-wheat-sourdough-sandwich-bread-with-maple-and-oats/
Thank you for the response. I just got finished making your recipe with whole wheat, and the main difference was that I had to wait about 24 hours for the rolled dough to rise in the pan, before I could put it in the oven. It could’ve been a weak starter or the kitchen temperature, but I woke up this morning and it had finally risen to 90% of the pan. I’m excited to cut it open.
It could be either of those things Lamarr…but I am happy that you woke up to a fully risen loaf! I hope it turned out well :)
Hi!
I love this recipe and have made it several times. I love that it is sourdough too.
I noticed my starter for this recipe more than doubled after 6 hour at 70-72 deg F. Should I still wait for the recommended 12 hours?
Thank you!!!
Hello Theresa! If your starter is ready earlier, then proceed earlier! So happy you love this recipe!
Can I use 100% bread flour instead of 50% all-purpose flour + 50% bread flour?
You can certainly try, but the resulting loaf may not be quite as soft.
Noted & thank you.
I have been baking using your recipe, and wow, we just love the soft texture and flavour! Recently I made two loaves at one go, one loaf rised 2x higher than the other. what is the reason? in any case, this is my goto recipe for a sourdough soft bread! Thank you for sharing this great recipe!
Oh yay! This makes me SO happy! I have no idea why one loaf would have risen twice as high as the other, lol! So happy this is your go-to recipe! Means so much!
Trying to make this bread in a pullman loaf pan that has a lid–recommend using or not using the lid during baking? Thanks!
I am trying to make this bread in a pullman loaf pan that has a lid–recommend using or not using the lid during baking? Thanks!
hello Frank – the lid is not used in this recipe. happy baking :)