Ingredients
Scale
FOR THE LEAVEN:
- 15 g ripe sourdough starter (at 100% hydration)
- 25 g water
- 40 g bread flour
FOR THE FINAL DOUGH:
- 290g flour (I used 50% all purpose flour & 50% bread flour)
- 25g sugar
- 30g butter, softened
- 2 large egg whites (about 60g)
- 5g salt
- 140g milk, at room temperature
- All of the leaven
Instructions
DAY ONE:
FOR THE LEAVEN: (start in the morning)
- Mix together your ripe sourdough starter, water & bread flour and let ripen at room temperature (73-75°F) for about 12 hours.
FOR THE FINAL DOUGH:
- Mix together the flour, sugar, milk, egg whites and leaven until just combined. Cover and allow this mixture to rest (autolyse) for 30 minutes.
- Once the dough is done resting, add in the salt and knead the dough until the gluten is moderately developed. When the dough comes together and starts to feel smooth and stretchy, add the butter in two additions, mixing the first addition in completely before adding in the second.
- Continue kneading until the gluten is very well developed and the dough passes the windowpane test as pictured above. The windowpane should be very extensible. It should stretch super thin but should also be very tough to break. When you poke a whole in the windowpane it will have smooth edges. Getting to the windowpane stage will take quite some time (15-20 minutes in a stand mixer), even longer if done by hand.
- Transfer the dough to a clean, lightly oiled bowl. Cover the bowl and allow the dough to rise at room temperature for 2 hours. After 2 hours, the dough will have expanded, but not doubled in size.
- Fold the dough into itself, cover the bowl tightly with plastic wrap, and refrigerate overnight.
DAY TWO:
- Take the dough out of the refrigerator and transfer it to a lightly floured surface.
- Divide the dough into 3 equal parts (I use a kitchen scale to get perfectly even portions) and lightly shape each portion into a ball. Cover with lightly oiled plastic wrap and allow to rest for one hour.
- After the hour, use a lightly floured rolling pin to roll each dough portion into an thin oval and roll up into a coil. Rest the coils for 10 minutes before rolling each piece into an oval again, seam side up. Re-roll each oval into tight coils.
- Transfer the coils to a non-stick loaf pan, seam sides down. Cover the loaf pan loosely with plastic wrap and allow the dough to rise about 6 hours at room temperature. The dough should be super puffy and have risen, to fill almost to the top of the Pullman pan about 90% (*if using a standard bread pan, allow the dough to rise to just before the top of the pan).
- 1 hour before baking, preheat your conventional oven to 400°F. Once the dough has finished rising, transfer the pan to the conventional oven and bake for 20 minutes.
- After the initial 20 minutes, reduce the oven to 350°F and continue baking for 15-20 minutes (the internal temperature should be at least 195°F). *If your loaf seems to be browning too quickly, tent it with a piece of foil to prevent it keep from burning.
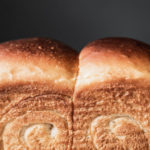
- When the loaf is done baking, turn it out of the bread pan and allow it to cool on a rack. Brush the top and sides of with melted butter while the loaf is still warm. Allow the loaf to cool before slicing.
TO MAKE THE PERFECT TOAST:
- Toast 1/2″ slices of bread in your toaster (*BALMUDA The Toaster if possible ;) and top with your favorite jam & then a dab of softened butter gently spread into the jam. Enojy!
- Prep Time: 45 minutes
- Cook Time: 35 minutes
- Category: Bread
Nutrition
- Serving Size: 1 slice